


|
|
|
|
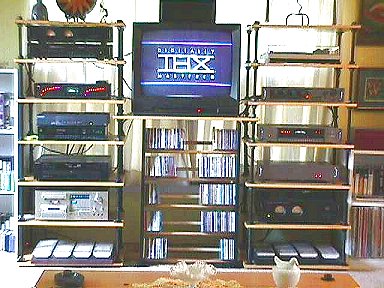
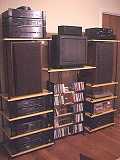
I have had a lot of interest in my rack, so here it is. If you're going to build it, read the long version.
[The short version]
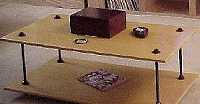
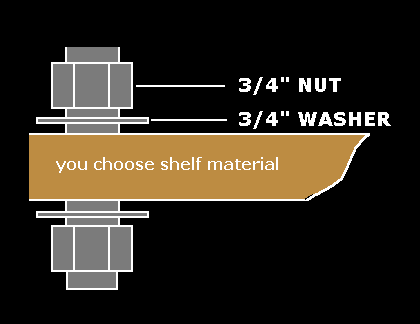
I built this rack, along with the coffee table, in my garage using few tools. It is made from 3/4" pana-ply ( a cabinet grade veneer ) and 3/4" all thread. I had the local lumber yard cut the wood and the local hardware company cut the all-thread that came in ten foot lengths. The shelves are 16 x 24 except the tv shelf which is 16 x 36. I edged the wood with 3/4" screen mold, stained it with golden oak and finished it with clear satin "Deft". The shelves are held in place by flat washers and nuts on both sides of the shelves. I used the flat washers as templates to cut 7/8" holes in the four corners of the shelves. The hardware is zinc plated, so I painted it with Krylon semi-gloss black. The coffee table measures 24 x 48. Total cost for two racks, tv shelf, and coffee table is about $250.00 US. The cd rack is an off the shelf item and not part of the audio rack.
[The long version]
These instructions will build 2 racks with 6 shelves each.
They will be 5 feet high and 2 feet wide and 16 inches deep.
I used additional material to make the tv shelf and coffee table.
Take a look here at the many variation of The Rack
READ ALL INSTRUCTIONS BEFORE STARTING!!!!!!
*********************************************************************
Material:
1 - 3/4" 4x8 sheet of cabinet grade veneered plywood. I used some stuff
called "Pana Ply" with a white oak veneer.
It has more layers and is denser than regular plywood.
80 - feet of 3/4" screen molding. Actually a little more to allow for cutting.
This can be in pine or oak your choice.
I use pine so save money and if you stain it, you really can't tell.
2 - 3/4" x 10' threaded rod. Look in the yellow pages under "nuts
& bolts" and ask for all thread. You want the Zinc plated because it
is a
better grade and clean (regular rod is greased). You will need to cut the rods
in half for 5 foot pieces.
You can have this done at the place you buy it to save you from having
to do it yourself.
96 - 3/4" hex nuts. Again Zinc is better to work with.
96 - 3/4" flat wahser. Ditto the Zinc.
4 - 3/4" rubber chair feet. These are the round feet to slip over the end
of the rod that will sit on the floor.
1 - box finishing brads
1 - small can wood filler
2 - cans Krylon semi-flat black paint
[Optional]
1 - can of stain of your choice. I used oil based golden oak.
2 - cans finish. I used satin "Deft" or you could just oil the wood.
*********************************************************************
1) rip the plywood length wise, making 4 pieces approximately 2 feet by 8 feet.
I had the local lumber yard do this.
2) cut these every 16 inches to end up with 12 pieces 16 inches by 24 inches.
Cut on the line so each piece will account for some of the
material lost from the cutting blade. Otherwise the last piece will be smaller
than the rest.
This isn't critical because no one is ever going to come in your house and measure
the shelves.
3) edge all these with the 3/4" screen mold. Be sure to center the molding
before nailing.
In some places it won't be flush but you will sand this smooth later.
4) use one of the flat washers at a template. Center in the corners with the
edges where the molding contacts the wood.
Mark with a center punch. Drill through with a bit larger than 3/4" to
allow the shelf to move easily. I used a 7/8" bit.
5) fill all crack and nail holes with wood filler.
6) now sand all sides. A belt sander comes in real handy here.
7) finish how you want
8) if you haven't had your allthread cut, this is where you break out the hack
saw and make your arm sore.
Cut each ten foot length in half. Sand the cut ends to keep from cutting yourself
later
9) paint all metal parts with the black paint.
10) assemble all pieces. Take a look at my rack page. Patience Patience Patience
NOTES:
1) Assembly is a very time consuming task.
2) If you want each shelf equally space, put half on from the bottom and half
from the top.
3)Don't forget the flat washers!!
4)Some paint is going to come off while your assembling. It's OK just touch
up after your finished.
5)Assembly is done easier with the racks laying down. The entire thing is wobbly
until tightened.
6)Put the feet on last - meaning the bottom shelf is a few inches from the floor.
7)Stand the rack up and measure all four corners of all shelves to make sure
the're even.
8)Take a picture and send or email to me and I will post on my site.
WHEW!
GOOD LUCK!!